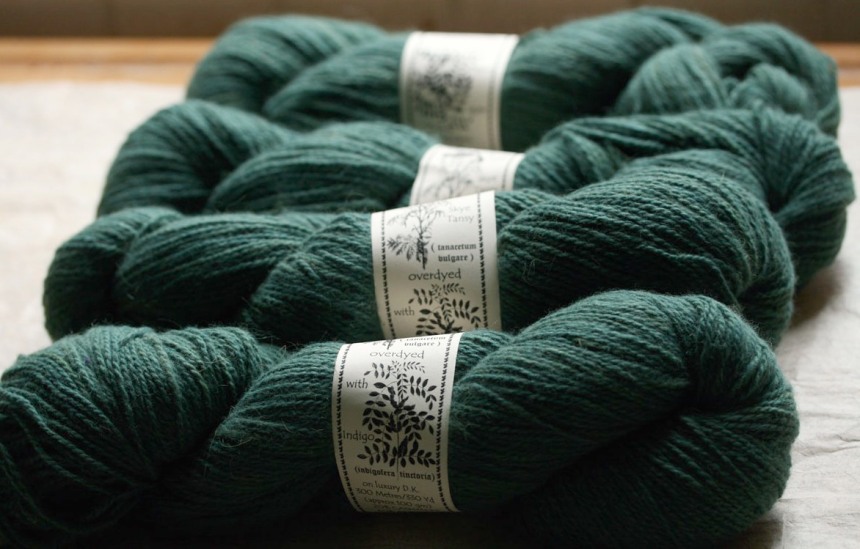
At some point toward the end of last semester, I became distracted in a meeting. There is nothing novel in this situation, except that the source of my distraction was a cardigan. My colleague, Kate C is a very stylish person, and often wears clothes I find inspiring and curiosity-inducing. This cardigan was both. It was a well-made machine-knit piece in a sort of egg-yolk yellow. The fabric was plain stockinette, and a neat fit was created with minimal shaping, except for a feature neckline, formed by a sunburst of pleats. These pleats were very pleasing. They set off the rest of Kate C’s outfit nicely, and made a focal point of the neckline that was both simple and elegant. How I liked those pleats! After the meeting, I talked to Kate C about the cardigan. She had bought it in New York, and, being a knitter herself, completely understood my fascination with the neckline. On the train home that evening, I thought about cardigan construction, and sketched up my own pleaty design. The challenge would be to create a simple garment as elegant and well-fitting as Kate C’s through the use of pleats and gathers, rather than conventional shaping. I drew pleats a-plenty and added puffed-out pockets and gathered wrists (which did not feature on Kate C’s original). Then I went to Skye and I bought this yarn.
I knew that after swatching with this yarn that it was ideal for my pleaty project. It had fabulous drape, some firmness and body, and a pleasing fuzzy halo. Then I did something that will suggest to you the sorry depths of my obsession with clothing and design. I found a dress in Fenwicks that I felt would suit the imagined cardigan ideally: a garment whose sole purpose was to set off an outfit that existed only in my mind. I bought the dress, and hung it in the wardrobe, where it remained unworn while it waited for the cardigan.
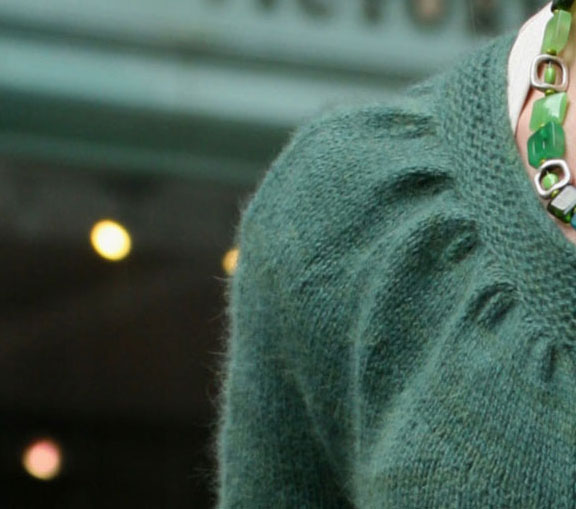
Then I began to knit. I began with a provisional cast on, and worked bottom-up, with minimal shaping through the body — just enough to give a slight A-line. The sleeves began with an i-cord cast on, were gathered at the wrist and joined at the yoke. I then shaped the neckline into a deep scoop with what, to myself and my knitting comrades, are known as “Sunday short rows” (so-called because Mel first encountered this technique in a design by the very talented Carol Sunday). These short rows are quite similar to the conventional Japanese method, but I find them much easier to execute and to describe. They are also the neatest method of working short rows I’ve come across, which was important, as I didn’t want traces of the turning points displayed across the cardigan fronts. I then knit the yoke straight to the shoulder line, and reduced two thirds of the stitches by working pleats. Until that point, I had felt like I’d been knitting a sort of giant box — but, as I pleated the top of the cardigan, the box suddenly transformed itself into a shapely garment. Here’s the neckline. I’m hoping that the only trace of the short rows you can really see is that sort of curved line two inches below the pleats.
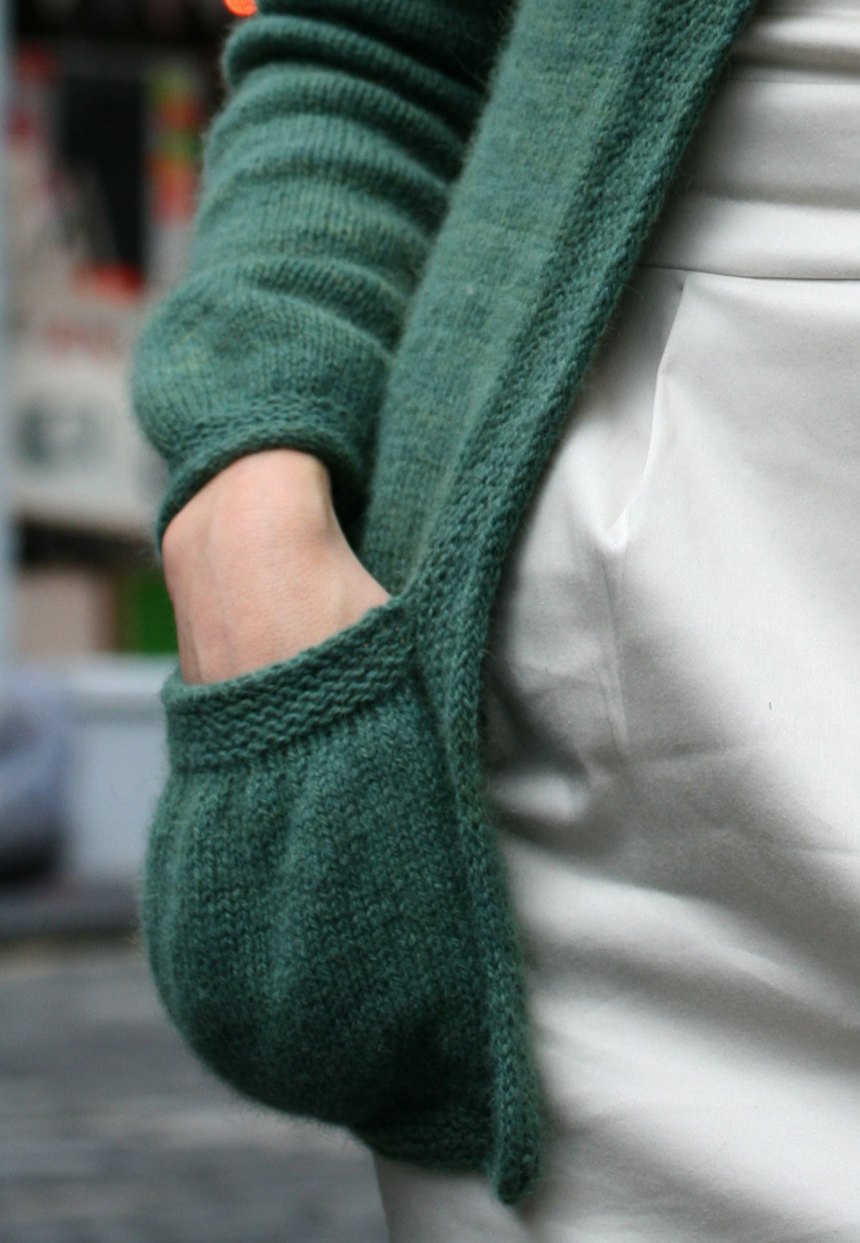
You will note that there is i-cord around the neckline, and will be unsurprised to discover that i-cord features everywhere in the finishing of this garment. It is worked along the pocket tops . . .
. . . across the the bottom edge of the cardigan, up the button bands, and forms the button holes. . .
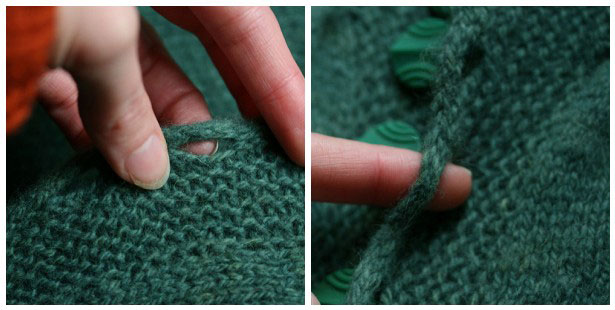
Please take a moment to examine the i-cord buttonhole. Note, if you will, what a neat edge it produces along a garter stitch border. Compare its superior qualities to those of lesser buttonholes. Observe how un-wonky an opening it creates, how there are no stray strands of yarn lurking annoyingly and untidily at its edges. Marvel at its ease of execution; utter a grateful encomium to Elizabeth Zimmermann; and assure yourself that your search for the perfect knitted buttonhole is over! Yes, I heart the i-cord buttonhole!
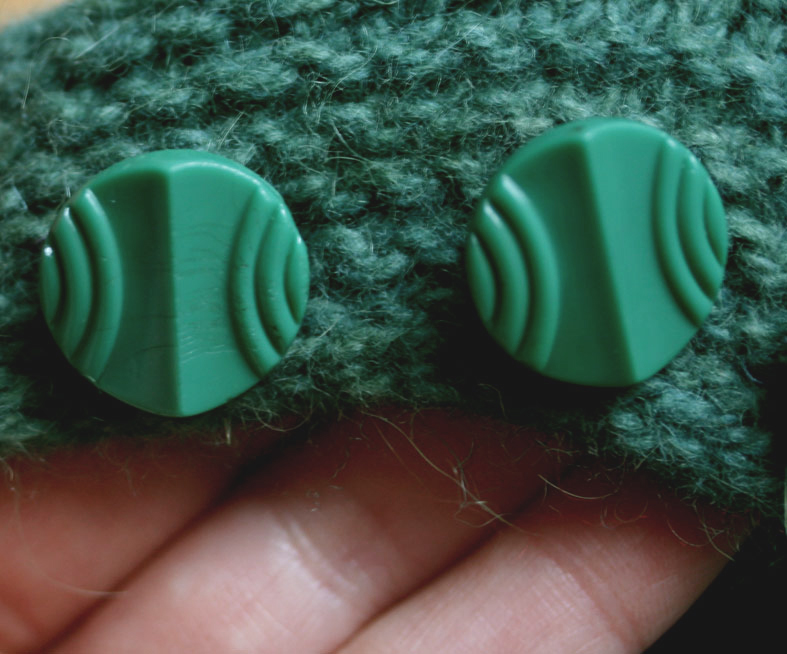
I found these vintage buttons on e-bay. I like the fact that they are made of glass, that they were (luckily) a precise tonal match for the yarn, and that they have been previously worn and used (as you can see from the button on the left).
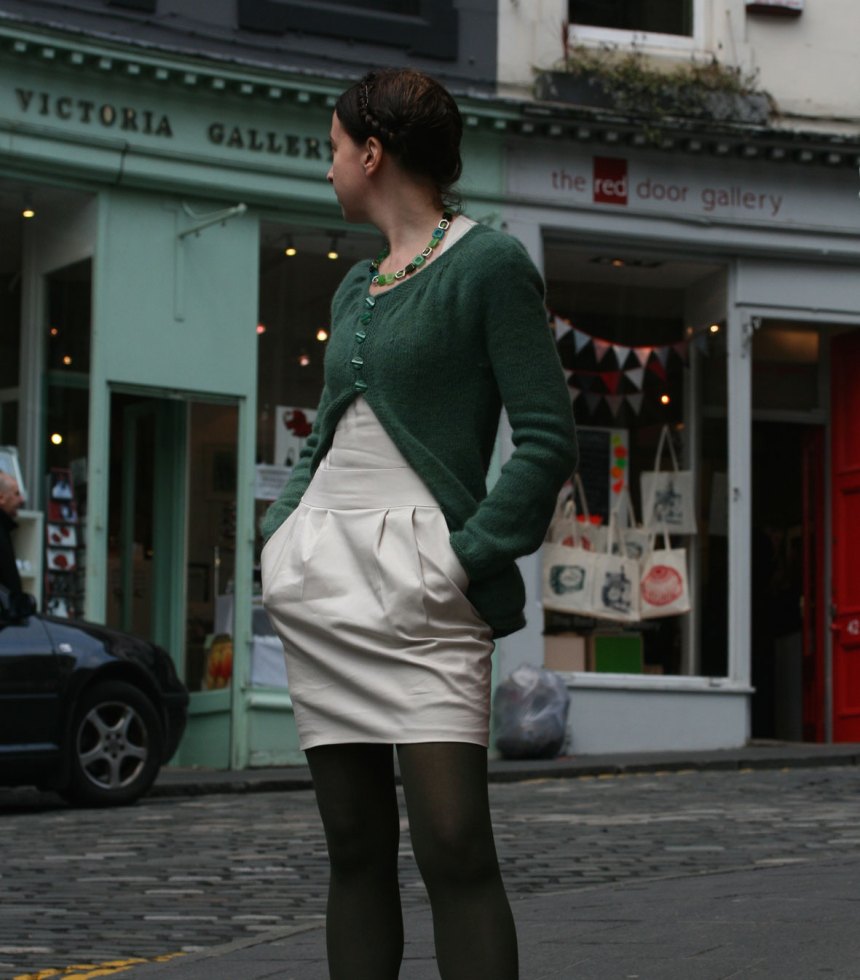
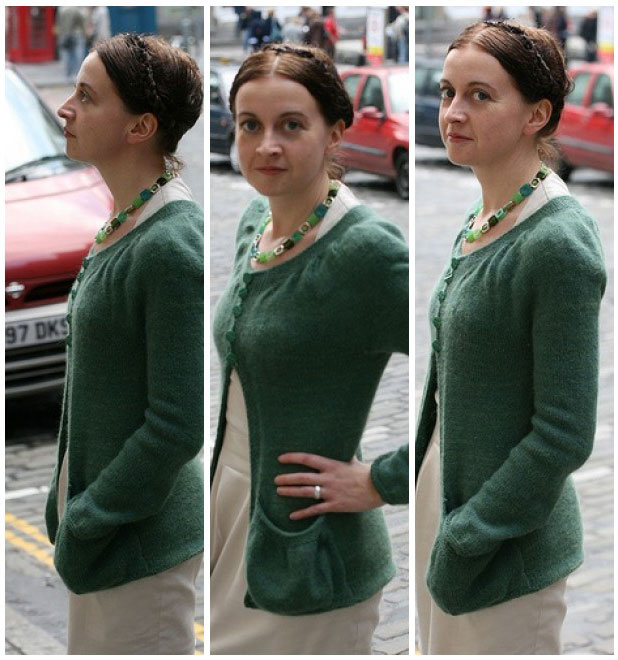
When I finished knitting, I asked Kate C to name the design, as she had originally inspired it. She chose Manu, the name of the friend she was visiting in New York, where she bought her cardigan. So here are some shots of Manu from the side:
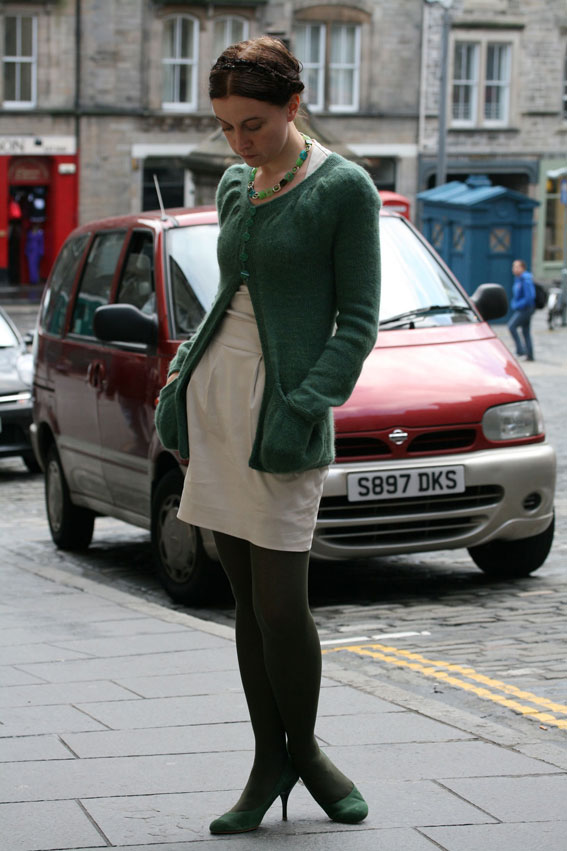
And a full-length, so you can see the dress too, which with its pleats and pockets, is actually a sort of echo of the cardigan.
I found the necklace in Philadelphia, where I finished working up this design. And Philadelphia has inspired another aspect of the pattern, which is now forthcoming. During my afternoon at Rosie’s, I had a chat with smart-and-interesting Lisa about garment design and sizing. She pointed out that my pattern size ranges were rather conservative, and didn’t really accommodate anyone whose body shape tended toward the Rubenesque. The good thing about this style of garment, it seems to me, is that it will fit and flatter most body shapes, including those who actually have a womanly chest, unlike myself. Women of all shapes and sizes successfully wear cardigans with this sort of yoked construction and triangular front opening — as can be seen in the range of knitters who look fabulous in Gudrun’s lovely Moch cardi, or Pam’s incomparable FLS. So, I am designing this pattern to fit a size range from a 30 to a 50 inch bust. More soon!
Name: Manu
By: me. pattern coming soon.
Yarn: Shilasdair ‘luxury’ DK in tansy/indigo.
amount: 3 and-a-bit 100g skeins. Approx 1000 metres.
Needles: 3.75 and 4.5mm. All worked with Addi turbo circs.
Ravelled here.

My brother recommended I would possibly like this blog. He was entirely right.
This submit actually made my day. You can not imagine simply how much time
I had spent for this information! Thanks!
LikeLike
Beautiful pattern, I have been looking for a cardi for my daughter to knit for me. I am sewist and must do a full bust adjustment so that patterns fit properly. Asking my daughter to simply knit a size large enough to fit my bust will result in a sweater that is too large for my shoulders and waist. Can you point me to instructions for how to grade between sizes in the same pattern? I’ve looked around a bit on raverly and did not see anything. Any way, I will get this pattern for my daughter, who does not need such alterations. She would look fabulous in it.
LikeLike
Thank you for this amazing pattern! It is amazing how much detail that is put into every element of this cardigan. I really enjoyed moving along the pattern, trying a lot of new techniques. Needles to say the result is stunning.
Thank you! Best of luck with your work X
LikeLike
Oh my! How soon before a pattern is published? What you’ve created is soooo beautiful! Can’t wait till I can get started, and I love the color you chose. Good job. Please let me know when & how to get a copy as soon as possible. Thanks!
Tami : )
LikeLike
what a beautiful top!
LikeLike
Gorgeous!
LikeLike
This is quite a lovely cardigan. I think you are very talented to design it. I am putting in my ravelry que.
LikeLike
hey . . . just wanted to say that I absolutely ADORE this pattern and would love to know if I could get my hands on a copy? . . .
xoxo
LikeLike
It’s beautiful, when can I make it??
If the pattern is still being worked on could you give an idea of the wool required so I can hoard it?
LikeLike
The sweater is gorgeous & very striking. I can’t wait for the pattern. I wold love to be able to design something. Maybe some day.
LikeLike
Thinking about the colour I will choose…
LikeLike
Love the cardigan and will definetely knit this! Thank you for desinging it for large sizes as well!
LikeLike
absolutely love! and the dress, want one of those too!
LikeLike
merveilleux
LikeLike
Gorgeous, can’t wait for your pattern.
LikeLike
Beautiful!!
Eagerly awaiting the pattern release.
Cheers,
Cheryl
LikeLike
Oh Kate,
It’s just love at the first sight. I’m dying to knit this stylish cardi though I’m busy like hell in Hong Kong…
Tracy ^ ^
LikeLike
utterly gorgeous. will await your pattern. cheers
LikeLike
I had to laugh when you said you bought a dress to go with your as yet unknit sweater. I’m 59, not particularly fashion conscious any more, but I do the same thing. And I only buy shoes that complement my handknit socks and stockings!
LikeLike
I might just be tempted to knit that size 50!:)
Beautiful!
LikeLike
Can’t wait until the pattern is published. It’s wonderful, wonderful, wonderful.
LikeLike
Really, really stunning, Kate. Slowly, but surely, I’m learning shaping techniques. Your cardigan is an inspiration to be sure.
LikeLike
This is totally gorgeous! My first time here and I’m very impressed – can’t wait to see this pattern, I think I may take the plunge and make myself my first sweater.
LikeLike
I bought some lovely DK weight tweed yarn last week at a sale, and have been dithering about what to do with it since. Should I design something new or use an existing pattern? I knew it wanted to be a yoked swingy cardigan, that much was clear, but which one? Provided the yarn I purchased is great enough in yardage, I believe I’ve found my answer!
And drat. SO many of your patterns are in my queue, and I’m having enough trouble keeping up with my own patterns to catch up. You keep coming out with more beautiful patterns before I can knit the ones that came before!
LikeLike
AH! I love it. So pretty, those pleats and I love that color.
LikeLike
Bloomin’ wonderful – the pleats, dress, AND shoes, that is!
LikeLike
I’m so envious of your ability to simply make up a garment like that! The cardigan is really very lovely, as is the dress you bought to go along with it – which doesn’t sound like a crazy idea to me at all :) Just the kind of thing I would do! Perhaps when you publish the pattern I will have a go at it… if I’m brave enough!
LikeLike
I am in awe of someone who can do that. . . wow. I am certainly a knitter but not an inventor!
And my issue with the swing open front cardis (discovered after making an FLS) is not the upper self (a lot of which I am not possessed of) but the lower self. . the belly. . . which tends to appear unflatteringly. BUT you look stunning in your stunning combo!
LikeLike
OK, this is gorgeous. I can not wait to see your pattern!
LikeLike
Do hurry with a pattern – I *love* this sweater!
LikeLike
This cardigan is gorgeous and absolutely my favorite color…and once again, I am exclaiming to myself, “Gosh, I wish I knew how to knit!!!” It’s not for lack of trying either
LikeLike
i-cords forming button holes, how clever !
This cardigan is amazing…
LikeLike
i-cords formit button holes, how clever !
This cardigan is amazing…
LikeLike
I think you’ve covered everything I’d want in a cardigan! It’s beautiful (and I like the dress too). It’s the kind of cardi that has me wanting a cup of tea and thick book with very thin pages. And somehow I can’t rid myself of the idea that the pockets should have pencil-shavings in them. I’ll have to do that when I knit my own.
LikeLike
How lovely! And thank you for the larger sizes!
LikeLike
I ADORE THIS. So excited for the pattern to be released!
LikeLike
Ooooooh! Love this! All those gorgeous pleats…
LikeLike
Lovely lovely sweater!! And thank you for the detail photo of the icord buttonhole! I had read a description but was having a mental block with picturing it.
LikeLike
Lovely sweater, well entire outfit actually. I’m particularly taken with all the green.
LikeLike
I love the sweater, the early dress-buying, and the expanded range of sizes.
Now I’m hoping you can post a link to Carol Sunday’s short row technique. Any chance that could happen?
p.s. I’m having a great time knitting Neep Heid, BTW.
LikeLike
So lovely! I’m really looking forward to the pattern. And what a great dress!
LikeLike
Gorgeous! Thank you for sharing the inspiration behind the sweater as well as the in-depth details included in the construction. I also appreciated the purchased accompaniments (and their provenance) that finish the look. I look forward to the pattern!
LikeLike
This is an utterly beautiful cardigan. Brilliant.
LikeLike
I was so hoping the end of this post would include promises of a pattern! It looks gorgeous, and as much as I gripe about the I-cord cast on, the I-cord button hole looks brilliant and I can’t wait to try it. Will be looking forward to this pattern for sure!
LikeLike
I LOVE this cardigan! PLEASE publish it soon!
LikeLike
Love it. Have some Jaeger orange merino in my stash that would be just the bees knees for this!
LikeLike
This is a beautiful pattern. I’ve never knitted a cardigan before but this has inspired me and I can’t wait to start!
Is there a correlation between i-cord and ‘i-talics’? Both are distinctive ornamental features of your blog posts!
LikeLike
I have been known to follow people subtly around a supermarket in an effort to work out how their knitwear is put together – it is nice to know I am not alone!
This cardigan is beautiful – I love those face-framing pleats. It looks lovely with the dress, but I can also imagine it becoming a cool, ‘urban’ layering piece with jeans. I personally appreciate that your designs cater for and flatter women like myself with very little bust, but I’m sure a lot of people will be glad that you are extending your sizing upwards.
LikeLike
OH MY, I just can’t wait for the pattern to be available. This will be my next must-have, it’s soooo gorgeous!
And you’re right, the dress matches perfectly the cardigan, congrats!
LikeLike
Oh god, I love it ! It seems I’m doomed to make almost all of your patterns and this one is yet another perfect design :)
LikeLike
So good to read of someone else beside me who uses her imagination to construct fantasy garments! I have been using agood bit of my brain in just this way for more years than I can actually believe(over 50)! Love your blog, you have re-inspired me to try to make (nearly) all my clothes, in British yarns/fabrics. Thankyou for reminding me who I am!
Love the cardi!
LikeLike
Oh, the cardigan of my dreams! I love it! Can’t wait for the pattern! :)
And I’m always happy to see you modelling your own knitwear as I have the same lack of womanly chest shape… :)
LikeLike
Just gorgeous , so elegant .
LikeLike
Oooh, now that is a cardigan I can see my “Rubenesque” figure in, and an interesting knit too – what could be better. Can’t wait for the pattern.
LikeLike
I love this design and the story of how it came to be. I cant wait to see the pattern.
LikeLike
Exquisite…
LikeLike
I have done this- purchased the parts or shoes or accessories to an outfit that does not yet exist. I so glad to see how successful was your endeavour.
I will be wanting to knit this one.
LikeLike
fabulous design – can’t wait. Will definitely make this one after years of swearing off “sweater” designs. But must add I found your July posting about Scottish cashmere fascinating … how I do love to read about knitting and what I call “knitting ethnography.” Thanks.
LikeLike
I love your designs and the manner in which you write about them.
LikeLike
so feminine, so flattering. Can’t wait for the patter to be published!
LikeLike
I love the Manu, as echoed above I am eager with anticipation of the pattern.
I also love that you imagine outfits in your head based solely on yarn…
Your blog is truly inspirational, every time I come back to read I find something new and interesting.
You are very talented and I am now going to research the finer points of i-cord
LikeLike
That is lovely! I will be anxiously awaiting the pattern publication.
LikeLike
Beautiful ! As usual… You are really going to convert me to i-cord !
LikeLike
Wow! That is an amazingly gorgeous cardigan. The design is so beautiful and flattering, and the colour and texture sets it off so well. I haven’t come across i-cord before. And the dress is a perfect companion. P x x x
LikeLike
The neckline is a thing of pure wonder, and I am all about that particular shade of grade. And I do believe you and your fantastic gams are ROCKING those heels…
LikeLike
Beautiful cardigan – I love all the little details especially the i cord buttonholes.
LikeLike
I adore this design and only hope that one day my knitting skills improve to a sage where I can attempt this.
LikeLike
I love this sweater! You did a fantastic job.
LikeLike
very pretty- i love the pockets. love too that your shoes match!
LikeLike
Oh! I’m in love!
LikeLike
I have some yellow merino which won’t decide which pattern it wants to be – I think it would be happy being this!
LikeLike
Really like this!
LikeLike
That is gorgeous! Another one here looking forward to the pattern.
LikeLike
This is so gorgeous, it is everything I’ve been looking for in a cardigan! You have such lovely taste, I can’t wait for this pattern!
LikeLike
I am captivated by the I-cord, and realizing that I do not use it to finish edges nearly often enough.
LikeLike
Very beautiful. I like its old fashioned elegance. Really enjoyed hearing about your creative process too.
LikeLike
Oh my goodness, Kate! It is simply wonderful. I can not wait for a pattern and am fairly certain that though I will try to put it off until I knock a few things off my list, nothing will get done =before I finish knitting such a perfect little cardigan.
LikeLike
This is wonderful Kate – I can’t wait to make it and wear it. The I-cord buttonholes are genius.
LikeLike
I love this so much. Thank you for the detailed explanation of how the design came to be!
LikeLike
Gorgeous!! Love the cardi – fab buttons and the pockets are truly lovely. I agree about the yoked cardigan suiting all manner of beauty shapes. Tending towards the Rubenesque myself, I used to stay away because I was worried about yoked cardigan looking like maternity wear but I lived in my people tree cardi since I bought it and think I will try a few yoked cardigans is the future!
LikeLike
So very beautiful and the dress too, the whole outfit looks amazing!
LikeLike
That is beautiful, and another thank you for keeping those of us with larger chests in mind!
I’ve just started knitting Dollheid and see why you love the i-cord cast on so much!
LikeLike
Gorgeous! I quite enjoyed the long and ranty linked post about cashmere, and agree that although Shetland would have been nice, your luxury yarn is perfect for this project. I can’t wait for the pattern to come out!
LikeLike
Oh, how I love this. And the idea of it in egg-yolk yellow really appeals to me. Gorgeous. I can’t wait until you release the pattern.
LikeLike
Oh, that is just lovely, and so very well photographed, too! I cannot wait to see the pattern.
LikeLike
beautiful cardigan, featured on my favourite street in the WORLD – there is really nothing that compares – in the best city in the world. what a combination.
LikeLike
She of the “womanly bust” thanks you for sizing up!!! This is yet another example of your brilliant construction.
Adore your mini love-letter to the I-cord buttonhole. Oh, and the shoes too!
LikeLike
très intéressant, comme toujours ; je lis chacun de tes articles
very interesting, as always ; I read each post you write
amitiés de France
kind regards from France
LikeLike
So gorgeous! I love the buttonholes, the pleats, and the pockets especially. Also, I love that you chatted with Lisa, one of my best blog buddies! It’s so neat when blogging worlds collide. Congrats on another fantastic pattern!
LikeLike
It was great to learn about your inspiration. I cannot wait to knit it!
LikeLike
It does look great on you, as do the dress and the shoes. Fit for larger sizes, however, is fraught with issues. As a short person who is a larger size, I find that items designed by Plus size specialists are cut for women built on a totally different scale – things like sleeve widths vary dramatically. Those pockets look great on you, but larger size people have hips and stomachs with their own bulges already, or, at least, I do. I often wonder how those designs in Yarn Forward work out for the person needing the 50 inch bust.
I love your blog and was delighted to see two entries in two days – such brilliant pictures.
LikeLike
It is going to screw up my Christmas knitting when you release this pattern you know!
LikeLike
What a beauty of a sweater and yes, it’s good that you bought the dress when you found it. Trust your instincts. Well done.
LikeLike
Thanks for the mention Kate! This is absolutely stunning….got to make one…and buy a cute dress to go with it!
LikeLike
stunning sweater — in fact, the whole outfit is fantastic. looking forward to this pattern!
LikeLike
It’s lovely! I’m also glad to know I’m not the only person who spends meetings reverse-engineering knitwear.
LikeLike
You may just well have come up with that holy grail of knitwear, The Cardigan to Flatter All Figures. I can’t wait to knit it. I actually keep going into paroxysms of knitterly satisfaction looking at it (pockets! the smoothness of the transition to sleeves! longline! buttonholes of joy!), which isn’t my normal demeanour at all, so wow.
Also, what fabulous shoes!
LikeLike
That is absolutely beautiful!
I frequently find myself distracted by knitwear. I once reduced a roomful of non-knitters to helpless laughter by explaining how hard it is to stay focused and not start wondering how to recreate someone else’s jumper or what would be a good yarn for a hat or how I could use a yarn in my stash. I don’t think they really understood, though.
LikeLike
The story and construction of this sweater are perfect. I am just swatching for a FLS and will await the arrival of your latest design with great anticipation. You are so clever. (Surely I’ve said that before, and I say it with the utmost respect!)
LikeLike
I cannot wait for this pattern – having recently become a sweater knitter, I’m queuing up sweaters like crazy – but this one is going to the top!
LikeLike
This is so beautiful! Thank you for sharing your notes on the inspiration and details of this sweater.
LikeLike
Gorgeous! I’m still struggling to knit things like that, let alone design them! Beautiful job!
LikeLike
I have long fought a battle to convince fellow they-with-overtly-womanly-chests knitters that we can indeed wear yoked cardigans which only button at the top. Thank you for providing me with another weapon, Kate. I actually believe I have the perfect shocking pink yarn in my stash for this cardigan. And I’m all about those pockets. Really.
LikeLike
This is so beautiful! I love very much how it fits, the satisfying drape of the fabric, and the beautiful way that the yarn and buttons complement each other.
Gorgeous x
LikeLike
Oh, this turned out beautifully. How satisfying to invent something and have it turn out just as you pictured. I’m excited for the pattern…
LikeLike
Oh Kate… you are so talented!
I love Manu, its i-cords all over the cardigan, the pleating, the way you conceived the shaping of the yoke, the pockets.
Well, there is no need to add that I will be patiently waiting for the pattern to start knitting my own!
Hugs from cold Toronto!
LikeLike
love love love this! Can’t wait for the pattern!
LikeLike