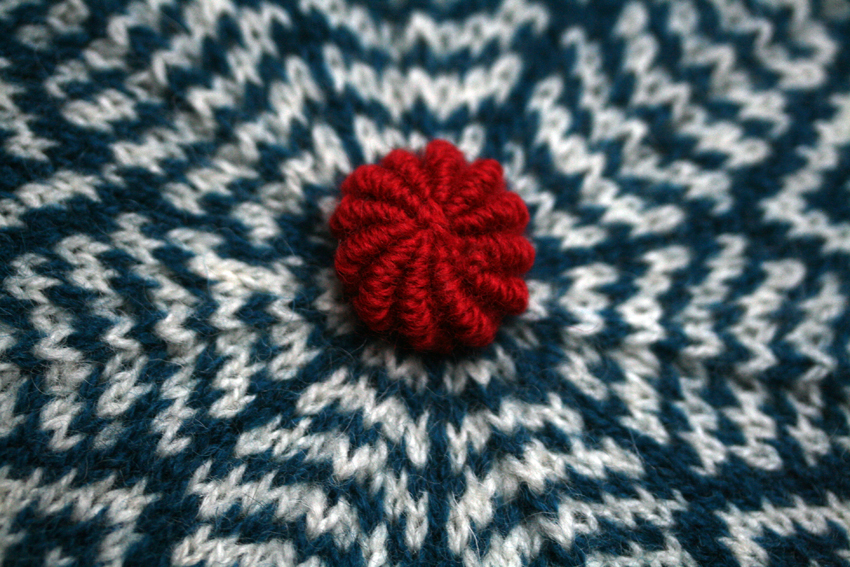
Here is a tutorial to make the covered buttons, used in designs such as my Richard the Roundhead Tam, and Scatness Tunic. (These instructions can also be found in my book Colours of Shetland.)
You will need: a plain button with a 1 in / 2.5cm diameter; thin cardboard (eg cereal box), sharp scissors, sharp needle, tapestry needle and a small amount of your choice of yarn.
STEP 1:
Select a button with a 2.5cm/1in diameter.
On cardboard, draw a circle 5cm/2in in diameter (I drew round the lid of a spice jar).
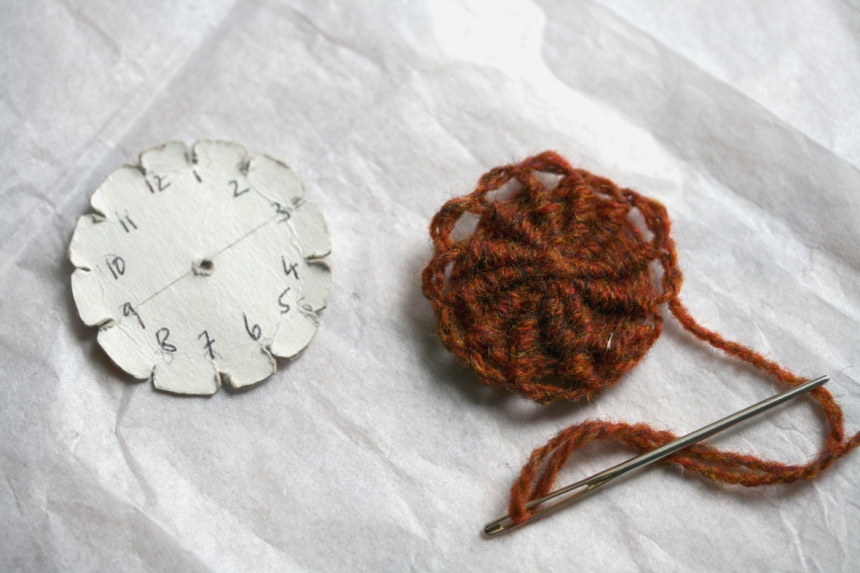
Cut out your cardboard disc; measure and mark the centre point with a ruler, and, with a sharp needle, poke a hole through this point.
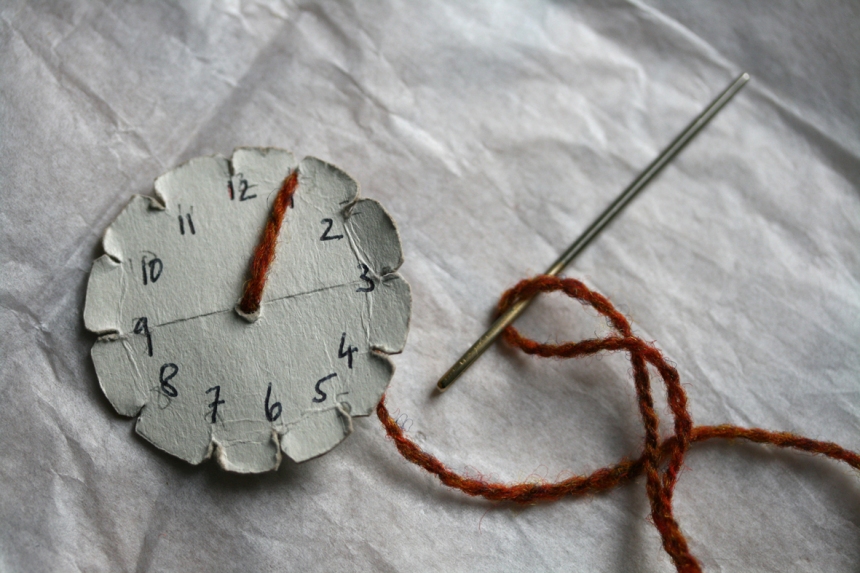
Mark numbers 1-12, around the edges of your disc, as if drawing a clock face.
With a pair of sharp scissors, cut shallow notches at each of the points 1-12 (notches should be no deeper than 5mm/0.2in)
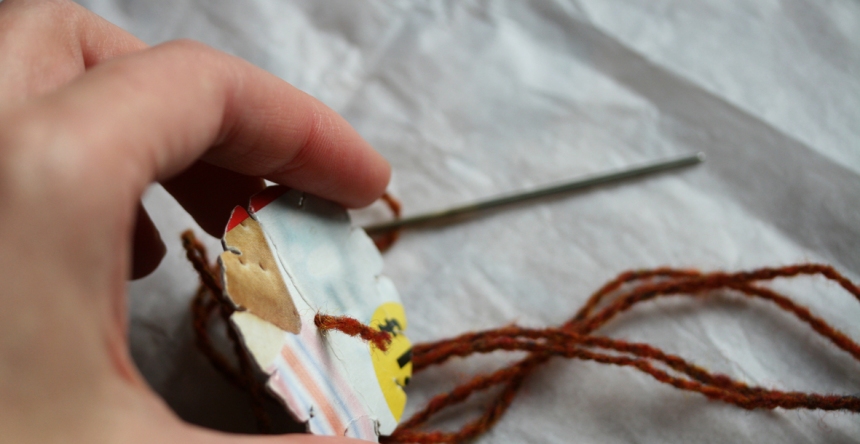
Take your yarn, cut off a 3ft length, thread your needle, and draw up through the centre of the disc, leaving a short tail no longer than 1cm/0.3in
STEP 3:
Draw the yarn across the front of the disc up to notch 1.
STEP 4:
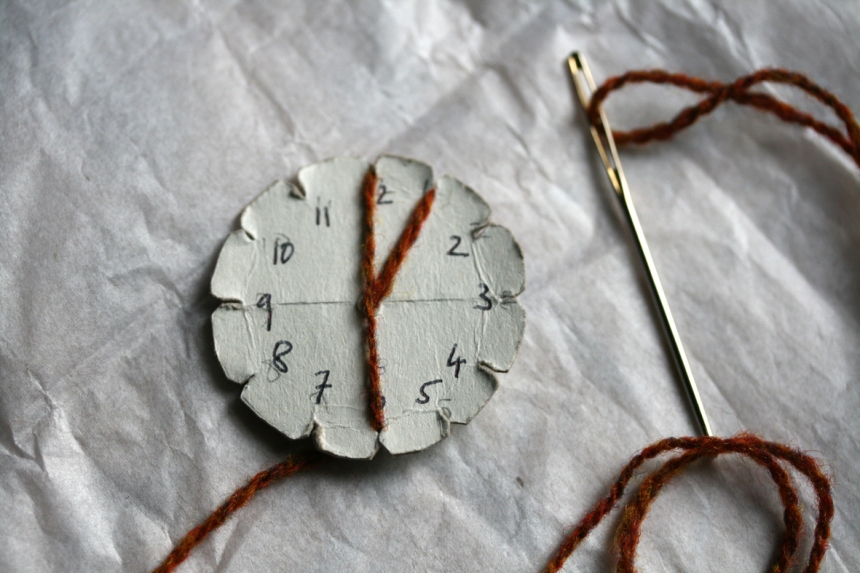
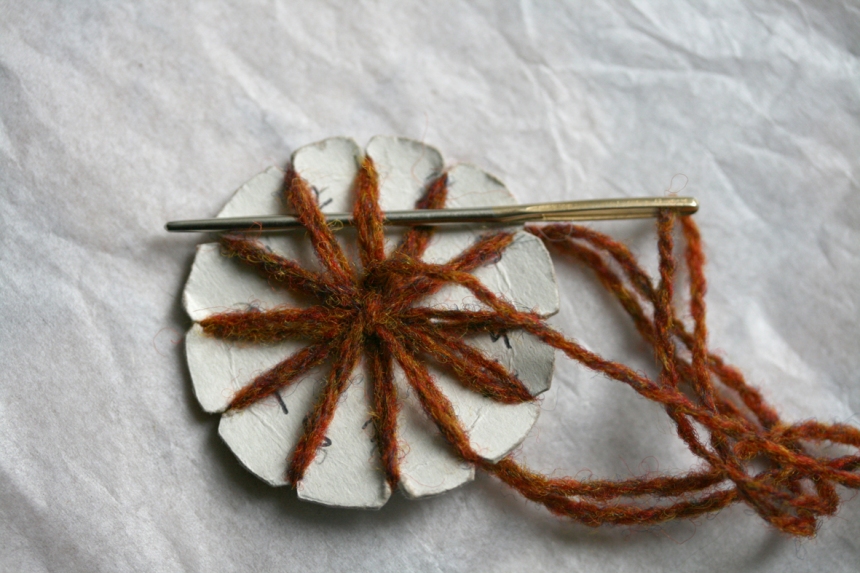
Draw the yarn across the back circumference of the disc to notch 12, secure it in the notch, then draw the yarn across the front diameter of the circle to notch 6.
STEP 5:
Continue securing the yarn into the notches by drawing it alternately across the back circumference, and the front diameter, in the following sequence:
6 ➝ 7
7 ➝ 1
1 ➝ 2
2 ➝ 8
8 ➝ 9
9 ➝ 3
3 ➝ 4
4 ➝ 10
10 ➝ 11
11 ➝ 5
5 ➝ 6
6 ➝ 12
12 ➝ 11
11 ➝ 5
5 ➝ 4
4 ➝ 10
10 ➝ 9
9 ➝ 3
3 ➝ 2
2 ➝ 8
8 ➝ 7
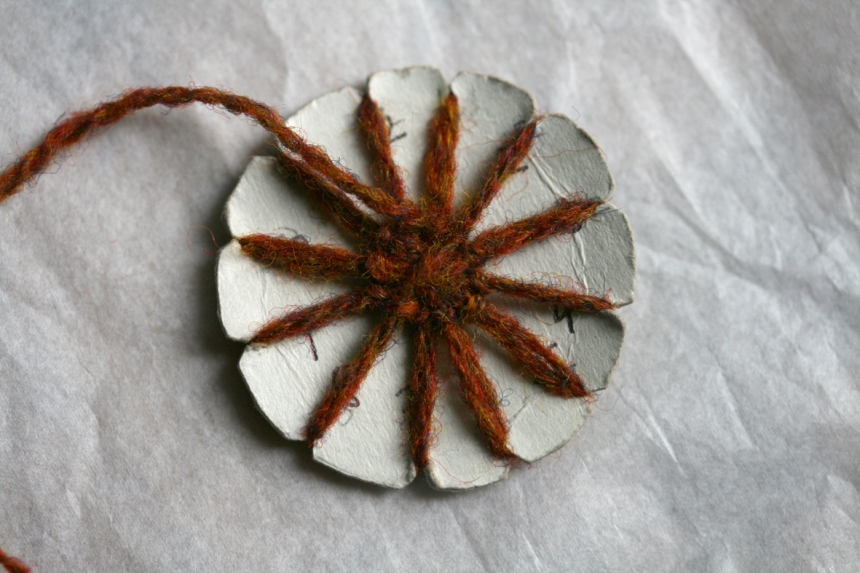
You have now created 12 front spokes, and 12 back loops.
Draw the yarn from notch 7 to the centre, securing it around the centre of the spokes.
Bring your needle up between spokes 12 and 1 as close to the centre as possible.
Then take your needle backwards over spoke 1, turn forwards and travel under spokes 1 and 12.
Now take your needle backwards over spoke 12, turn forwards and travel under spokes 12 and 11.
STEP 7:
Continue weaving in this manner, working anti-clockwise, and drawing the yarn backward over 1 and forward under 2 spokes around the disc. This process wraps and defines the spokes, creating the ridged surface of the button covering. (If you run out of yarn, simply secure the old thread under the spokes, cut a new length, draw it up through the hole at the centre of the circle, and begin weaving where you left off)
STEP 8:
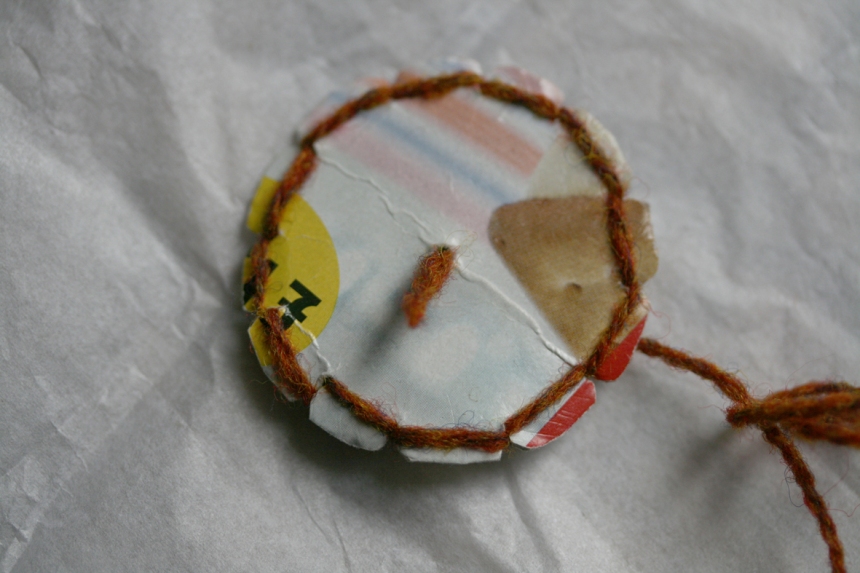
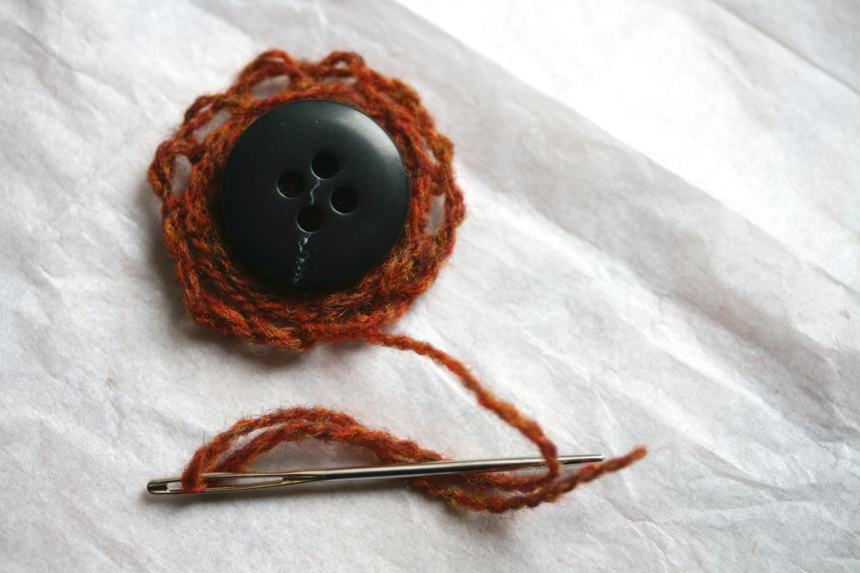
When you reach the edge of the disc, turn it to the back, pass the needle under the loop between each notch, and lift it off the disc. Continue around the disc, lifting each loop off in turn, taking care not to let your yarn draw up too tightly.
STEP 9:
Remove the button cover from the cardboard disc.
STEP 10:
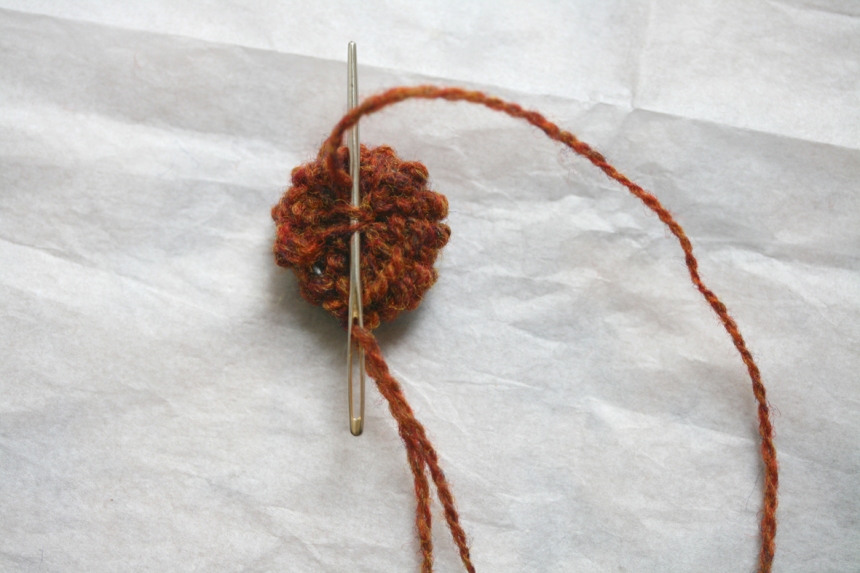
Place the button face down on the back of the button cover.
STEP 11:
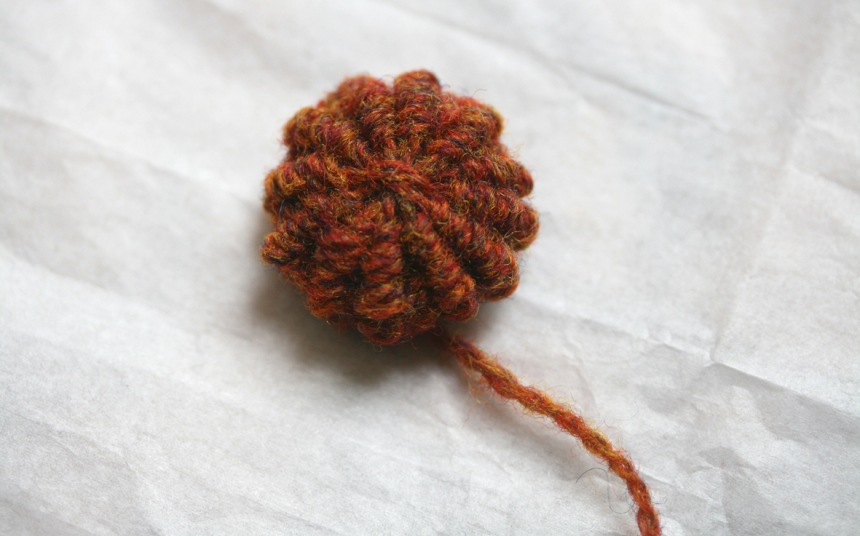
Carefully pull the yarn, drawing in the button-covering to conceal the back of the button. Make a few stitches across the back, securing, tightening, and neatening the button covering so that the button is completely concealed.
STEP 12:
Ensure you retain a length of yarn long enough to secure your button.
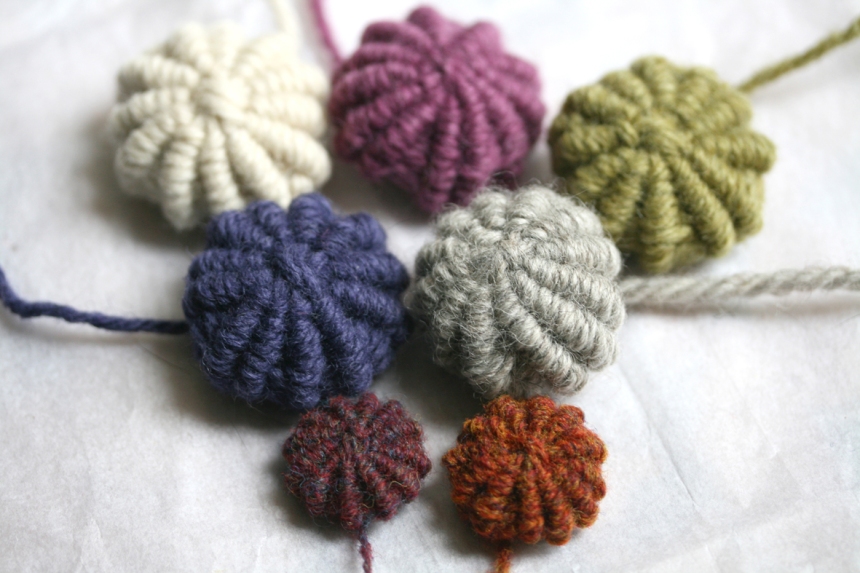
Buttons can be made in any size, using your choice of yarn or thread. Just make sure to cut your cardboard disc about 2.5cm/ 1in larger than your buttons. And watch out: once you start turning them out you may find yourself unable to stop . . .



THANK YOU!
I always thought these buttons were crocheted!
LOL!
LikeLike
Bello trabajo. Gracias por compartir el tutorial!
LikeLike
Love these. One question. Is there any reason why I need to use an actual button in the middle? I am thinking of trying plastic circles cut from milk containers as an alternative way of recycling some of them (I have already used it in other knitted “constructions” – bases of knitted nativity figures and inside Clanger feet – I wish I didn’t have to buy the milk in plastic containers – but am currently living in Harare and have not seen fresh milk in anything other than plastic).
LikeLike
I don’t know if you’ll ever see this reply, Su, but…this is brilliant! I wanted to try making these for non-button purposes, and milk jug plastic would work wonderfully for me. Thank!
LikeLike
Estos botones son muy originales. Vamos a intentar hacerlos.
Nos ha encantado conocerte en persona en el Festival Yarn Edinburgh. Mil gracias por hacerte una foto con nosotras. Te seguimos desde hace tiempo y nos gusta mucho todo lo que haces!!!
LikeLike
Thank you so much ! I just finished knitting a ” Downton Abbey” type hat, in emerald green with a royal blue band around it.
With short rows it made a rounded type of flap in the green that flips up over the blue band. A button on the green flap in the Royal blue yarn would be lovely ! ( I think ! )
LikeLike
merci !!!
pour ce tuto je ne parle pas anglais mais avec un traducteur c ‘est parfait
je vais continuer de faire d’ autres boutons
ANNY FRANCE BRETAGNE
LikeLike
Holy cow, this is awesome! Thanks!
LikeLike
Many thanks for the tutorial. A wonderful button.
LikeLike
Reblogged this on marguerite1987.
LikeLike
Reblogged this on knittersjoy.
LikeLike
I hate being a wet blanket but…I need a button for a cape knit with bulky yarn. I fear this pattern isn’t suitable, tho I sure wish it was.
LikeLike
Take your cape to a shop that sells tapestry wool, I am sure you will find a colour to match. :-)
LikeLike
Un grand merci Kate ! J’ai beaucoup aimé réaliser ce bouton grâce à ce tutoriel très bien expliqué pour finir mon bonnet : http://ouvragesdedames.canalblog.com/archives/2015/01/10/31253087.html
LikeLike
A lot of thanks it’s grate
LikeLike
Reblogged this on SHEEP & SHAWL and commented:
Look how beautiful these buttons are! Thank you Kate Davies!
LikeLike
Love love these buttons! I made them and brought them to my knitting class friends who loved them too. So nice to always have a button that matches! Thank you thank you–
LikeLike
This looks so fun. Never a problem finding buttons to match again. Thanks so much for posting this great tutorial. Fleece and Love!
LikeLike
Wow. I love this!
LikeLike
Such a button must require a larger buttonhole opening? it seems bulkier than one that is flat and/or of a shiny/slippery material. What do you recommend as an allowance?
LikeLike
♥ Amazing as usual, Kate. Thank you!
LikeLike
What a brilliant idea and tutorial. Thank you. Will definitely use this.
LikeLike
I love buttons and these are great. Thank you for sharing these. I can’t wait to whip some up.
LikeLike
How do you think of these wonderful things? Beauty in its simplicity.
LikeLike
Merveilleux, qu’elle bonne idée, Nathalie
LikeLike
Thanks for sharing with us these wonderful buttons. A hug from Barcelona.
LikeLike
This is absolutely fantastic, thank you for the detailed tutorial !
~ Aina ~
LikeLike
Brilliant! Thanks :)
LikeLike
This is a great idea! Thank you for sharing :)
LikeLike
Stunning!
LikeLike
Thanks ever so much. You are a constant source for inspiration.
LikeLike
Oooh! I could make brooches using large buttons! Thanks so much for sharing, Kate. :))
LikeLike
These are so lovey – thanks for sharing the tutorial, can’t wait to have a go!
LikeLike
These are fabulous, thank you!
LikeLike
Fab!! Thank you.
LikeLike
Prompted by the BBC website photos of 1959 curling on Loch Leven I did a bit of a search and came up with this video from the Scottish screen archives: http://ssa.nls.uk/film/5489 Should serve as future inspiration for team garb.
LikeLike
love this! I have tweeted the link.
LikeLike
Thanks so much for this tutorial! I will get going this weekend!
LikeLike
They look absolutely gorgeous; I’m going to have a go today, while I watch the Olympic Curling Final! Thanks so much and hope you’re feeling better.
LikeLike
You’re a doll!
LikeLike
Reblogged this on Curls and Q and commented:
I so want to do this!! She makes it look so easy.
LikeLike
Wow!!! I just made one of these from your instructions. Awesome button!!! thanks!!!
LikeLike
That’s awesome. Thank you!
LikeLike
Never having heard of Dorset, or even Yorkshire, buttons here in the States, I am in awe of this process. The human brain, and particularly the brain of Kate! O my goodness.
LikeLike
These are so beautiful, they remind me of nice vintage teapot covers :D and Love your new site Header! X
LikeLike
Thank you!! I am just finishing a child’s sweater and this will be the perfect button. I don’t often leave a comment, but I love your blog and look forward to seeing your new posts!!
LikeLike
Wow! I need buttons for a vest I made my mother and I haven’t been able to find anything I like.
Thank you so much!!!
LikeLike
I will definitely try this. Thank you so much for the great tutorial!
LikeLike
This is great! Thank-you so much.
LikeLike
Excellent! Thank you :-).
LikeLike
So lovely! Thank you for the detailed explanations.
LikeLike
I teach Dorset buttons as well, small world:-) These look like they’re made in a similar way to Yorkshire buttons (of which I know very little other than how they’re made). The stitching is what you would do to make a grindle button. I’m all for making your own buttons for garments and they are very addictive.
Thanks for a fantastic tutorial. I’m looking forward to making a different type of button.
LikeLike
I teach Dorset buttons as well, small world. These are great. They look similar to Yorkshire buttons. I’ve never managed to find much history on them. You make Grindles with a similar stitch as well. I’m all for making buttons to go with outfits. You get something that matches your garment perfectly and making your own buttons is very addictive. Thanks for a fantastic tutorial. I’m looking forward to trying a different type of button.
LikeLike
thank you, wonderful tutorial. I teach Dorset button making but have never seen these. Can’t wait to give them a go!
LikeLike
Lovely buttons! Thank you for tutorial!
LikeLike
I loved my covered buttons so much I put them on Ravelry. Thought it might encourage others to do so. To date this has not happened yet…
LikeLike
Thank you so much for this awesome tutorial. Love these buttons!!
LikeLike
Brilliant .
LikeLike
Thank you so much for this brilliant tutorial!!
LikeLike
Reblogged this on daisymarmalade and commented:
A nifty way to make woollen covered buttons. Great for a neat finish to your project.
LikeLike
Love the buttons…beautiful. Please tell us about the black and white mitts in the photo.
LikeLike
No question…this is the most adorable thing I have ever seen. I’m putting my child to work on these as soon as she gets home.
LikeLike
So nice. Thank you for the tuto
LikeLike
Thank you Kate. What a gorgeous finish!
LikeLike
you must love us
x-x-x-x-x-x
thank you!!!
LikeLike
What a fabulous finishing touch!
Thanks so much.
LikeLike
Thanks so much! I think these would make lovely gifts for friends who like to sew!
LikeLike
Thank you! I absolutely love these buttons, and they’ll be fun to make!
LikeLike
Love these! Thank you so very much!
LikeLike
Thanks for this great tutorial, Kate.
LikeLike
Thank you, thank you, thank you!
Sheila
https://www.etsy.com/shop/sheilalikestoknit
LikeLike
In the “good old days” of fabric and buttons, it was easy to find a beautifully made button; not so anymore! I hate spending hundreds of dollars on fabulous yarn, knitting for hundreds of hours, and then facing the unhappy realization that I can not locate a custom button that equals the sweater. Now, I can create my own! thank you! I am going to practice! You are brilliant, Kate! A really excellent teacher. Thank You for taking time away from knitting to help us all!
LikeLike
Since I design and knit mostly cardigans and jackets, these have a lot of appeal. They are perfect for the top of a hat, but I wonder how they would stand up to wear on the front of a garment… I suppose one could always crank out a replacement fairly easily. On my list of things to try out.
LikeLike
Thank-you so much for this! Those covered buttons are wonderful and I know I will but a cardboard button disc to lots of use just it looks like yours is!
LikeLike
I love these, I can imagine they will prove addictive. Not sure I will be able to watch subtitled Scandinavian drama at the same time though.
LikeLike
I love these buttons – thanks for the tutorial!
LikeLike
These are wonderful! Thank you so much for sharing this with us. Do you use less spokes for smaller buttons?
LikeLike
So cool! Love these!
LikeLike
Wonderfully clear instructions and gratefully received. Super buttons, not just decorative, but extremely useful for those times when size and colour cannot be matched and something extra is called for. Many thanks.
LikeLike
Many thanks for the tutorial.I will immediately try to make one. Thanks again.
LikeLike
I love the texture of the covered buttons, just in themselves. I think they might look rather good as adornments or decoration on the lapels of heavy dark winter coats. …Oh dear, and I haven’t even started to make them yet! I can see why you say they might be compulsive!
LikeLike
Creativity is surely the work of the Higher Up Universe. I have reached 82+ and not even attempted 99% of needlearts I have admired. Took me 40 years to try entrelac. LOL
I can picture this type of button on a sporty jacket – including on a man’s jacket.
Without an actual button included, would this work for when a frog closure is used? Hmmm.
The button holes are not used anyway – the button is only for structure, as far as I can tell.
You are all wonderful!
LikeLike
An excellent tutorial and certainly a more pleasant alternative to the slog of button shopping. They remind me of Dorset buttons, particularly in their construction, although with the whole button as a foundation, these would probably be tougher. Does this style of button have a similar history to Dorset buttons?
LikeLike
Yes, very much so – They are very similar to the very early design “Dorset Knob”, though these early designs (about 17th century!) were made using a wad covering a disc of somesort with linen, and then working the threads over this. This demonstration is just what I have been looking for. Shall very much look forward to having a go. Thank you so much Kate.
Does anyone have any experience of creating an amonite design?
LikeLike
So beautiful! Many thanks.
LikeLike
Fabulous Kate, thank you for sharing these with us :)
LikeLike
Thank you, I will try it!
LikeLike
Wonderful, thank you!
LikeLike
Thank you for thd tuto. Nice result !
LikeLike
I love these. Thank you for the tutorial.
LikeLike
I fear for my button collection. I’m currently knitting my very first aran cardi for my 6 year old. She’s definitely getting these for buttons.
Then the Roundhead tam.
LikeLike