

We all know that proper blocking can really transform knitted fabric and I think that most knitters understand the importance of carefully blocking something like a lace shawl, with pins and wires, so that all the points and yarnovers all sit correctly. But it does seem to me that we perhaps talk a bit less about the transformative effect of blocking upon three dimensional things – like hats.

Perhaps that’s because some hats are pretty much head-ready and don’t need much blocking . . . but there are many types of hat which will definitely benefit from a good three dimensional stretch. That’s certainly the case with a tam or beret, which can be blocked to the required shape over a small plate, and it’s true, too, for some hats of the beanie or toque type such as Easwas.

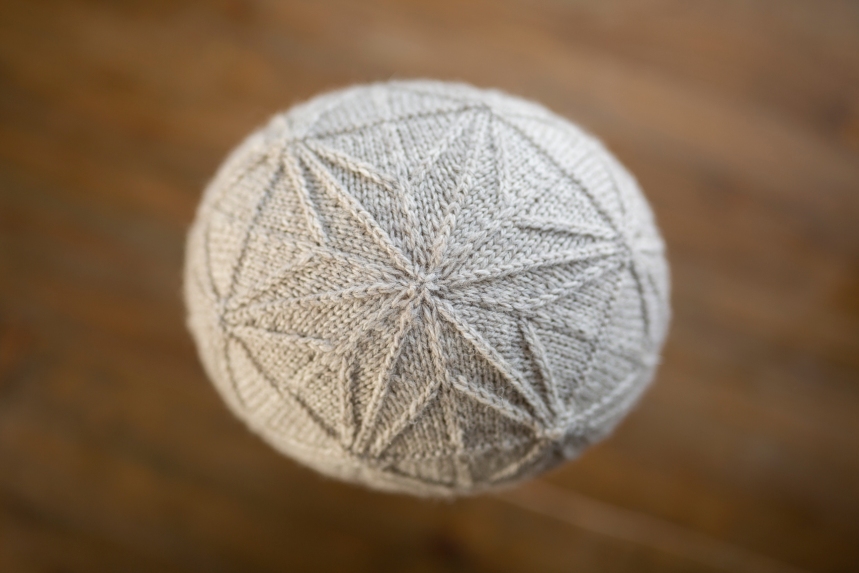
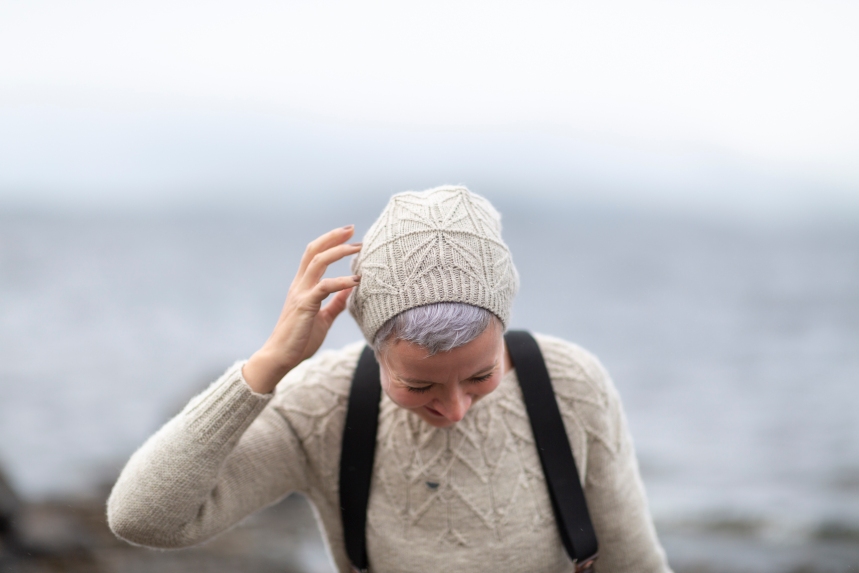
The fabric of Easwas is defined by strong vertical and diagonal lines (formed by purls and twisted stitches) and strong horizontals (formed by garter stitch). While all of these lines, once knitted, want to retain their geometry, you want to block your hat into a much more rounded, spherical shape that’s going to sit nicely on your head.
This is what Easwas looks like unblocked:

I’m showing you this phone snap so that you are not concerned, upon first finishing your Easwas, in having appeared to have knitted yourself a small, strange chimney top. It is a hat that looks decidedly odd just off the needles! The freaky tubular appearance is caused by the drawing in of the vertical purl columns that separate each repeat, and the desire of the crown to form a natural fold. Everything looks a bit wonky and uneven. But worry not: with a good blocking, all of these lines ease up, the fabric evens out, and the hat settles down into a comfortable, rounded slouch.

To block a hat into a slouchy shape like this, I use a milliners block.
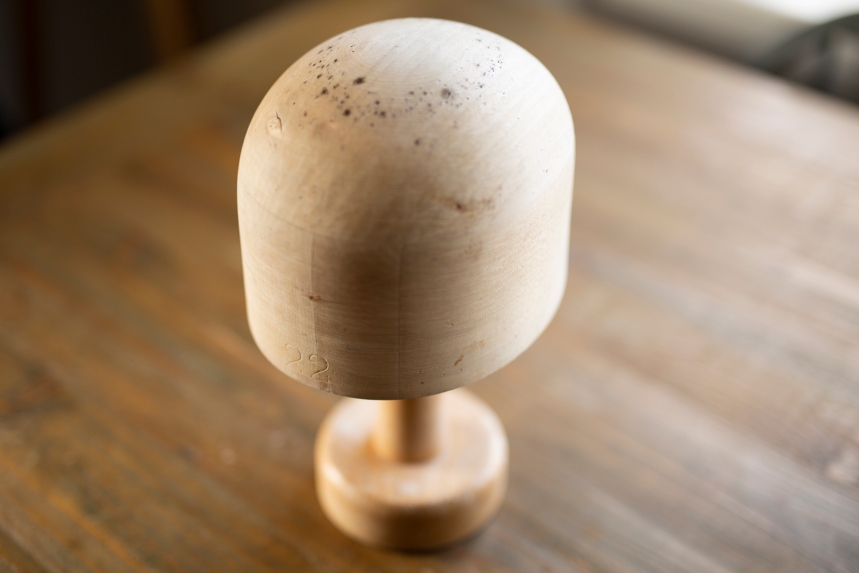
This is a vintage block that I bought on Ebay many years ago. They don’t come particularly cheap, but you might well feel that a decent block is worth it if you are, like me a very committed hat knitter.
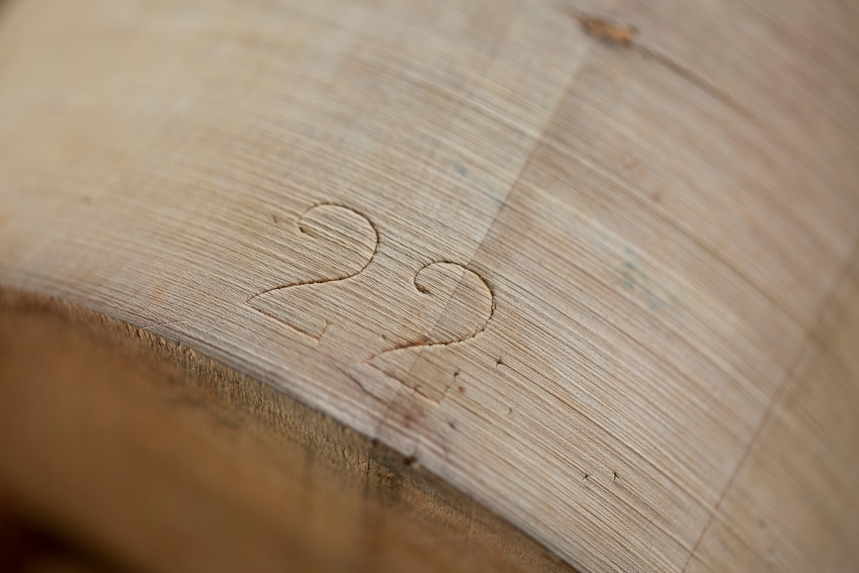
Milliners blocks come in standard measurements, and mine has a 22 inch circumference. I find that blocking my hats to 22 inches (2 inches larger than my head) gives the fabric a really good stretch, and allows all the stitches to settle into shape. Once dry, and off the block, the hat contracts a wee bit, and fits me really well.

To block a hat, I soak it in warm water for about 20 minutes, remove the excess water, then position it on the hat block.

I like to fold the rib in on itself a little, so that the brim of the hat is not overstretched. Sometimes I use pins, as shown here with Easwas, or sometimes I’ll thread a length of contrasting yarn through the rib with a tapestry needle, and draw it tight, so that the rib is secured in place. Once the hat is dry, you can just cut the threaded yarn and remove it.
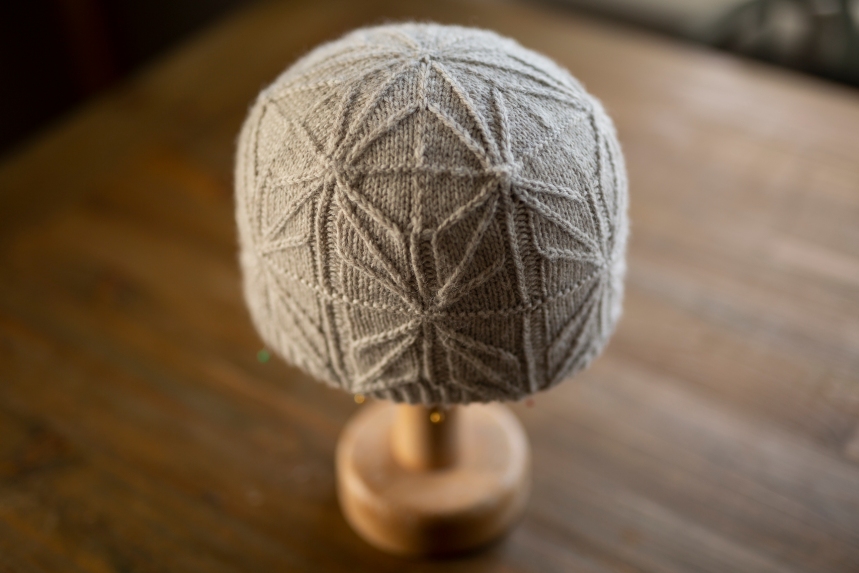
Once stretched over the block, the stitches begin to achieve a really good definition, the fabric evens up, and the hat’s crown is nicely rounded out across the top.
Leave until properly dry – to set the stitches – and then remove from the block.
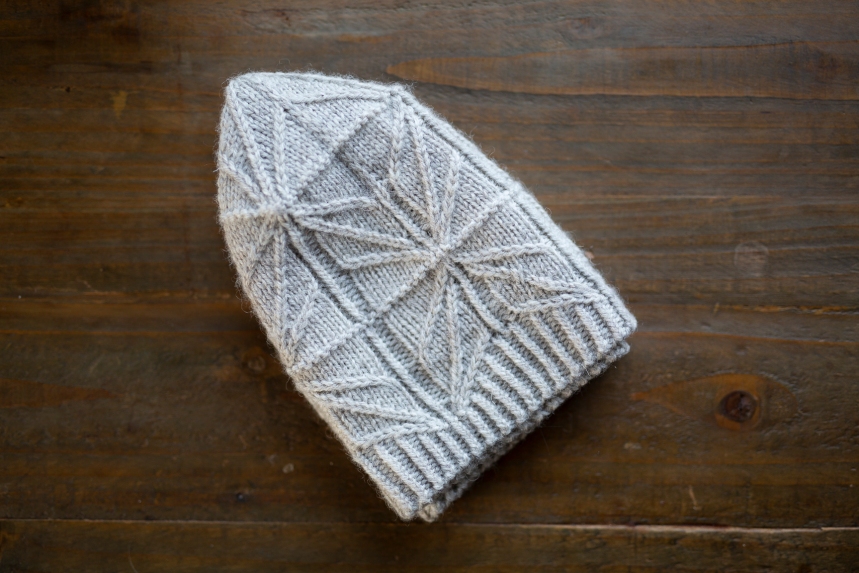
A hat with a 6 point crown will very easily retain its blocked shape by being folded lightly in half, like this. Flat, with a light half-fold, is how I store my hats, when they are not being worn.
Though I love my milliners block, I know that most knitters aren’t likely to have one – or indeed to need one. Because really, the most important thing is just to block in three dimensions; ensure that the hat’s stitches are getting a really good stretch; and check that the centre of the hat is filled to capacity (with stuffing, a small ball, or a balloon) to dimensions that are a little larger than your head (or the head the hat is to fit). Blocking like this will help the hat’s fabric to even out and resolve itself into an appropriately rounded shape.

Happy blocking! Enjoy your hats!

COMMITTED HAT KNITTER – this needs to go on a badge! Hurrah for the power of blocking – after you shared your hat block here, I found one on eBay in need of major repair. It was clearly a very well-used object and had a lot of holes and a jagged bottom edge, for which reasons it was not very expensive. I repaired the jagged edge and holes on top with sugru… it’s like a five-petalled wooden shape. No base on mine but I tend to tuck the hat brim underneath just as you do and then use the weight of the hat block itself to keep the blocking hat in place. I have noticed a huge difference in how my hats block out using this wondrous wooden item! I love blocking so much – for relaxing the twist out of wool that has been introduced through knitting, and to ease some of those shorter fibres out into a wonderful woolly bloom. Thanks for before/after pics of EASWAS – I love seeing the transformation from poky knitted chimney to glorious geodesic heid palace.
LikeLiked by 1 person
“geodesic heid palace” shall hereafter be my preferred description
LikeLike
Dear Kate, you can tell I’m a novice but was wondering, do you block every time you wash or is blocking a one time post knit process? L x
LikeLike
To be honest, my hats really don’t get washed that often . . . but when I do wash them, then yes, I re-block over the hat block. I always reshape and pin out sweaters after washing too.
LikeLike
Well, that took me down a giant rabbit hole of milliners blockers! What fun! I’ve used many a kitchen item and plastic bags, etc to block over many, many years but this looked like a fun device to have!
I’ve found a nice one for a “reasonable” price (minus the shipping) and look forward to using it. I’ve told all my friends that if they need their hats blocked forthwith, I’m their girl!
LikeLiked by 1 person
There is no way I would have believed your hat looked like that when it first came off the needles! Or. . .the other way around. . .no way I would have believed that odd chimney-shaped object (hahahahaa!) would have turned into your hat!
LikeLiked by 1 person
This made me smile, as I have the decidedly improvisational approach of blocking my hats over a bowl balanced on a roll of paper towel! Works very well for me, it must be said. :)
LikeLike
I have found a balloon is ideal for blocking most beanie type hats. You can easily adjust the size (for kids hats maybe) by blowing the balloon up more or less.
I dry mine gently in our linen cupboard, which is warmed by the hot water tank. You can balance the balloon on a mixing bowl or similar if you wish.
Blocking really transforms colour work and anything with travelling stitches. Definitely worth the effort.
LikeLiked by 2 people
Never knew there was such a thing as an actual “hat blocker”, but now I will keep my eyes peeled for one! The best hat blocking tool I’ve found to date is a styrofoam florists’ ball, which come in various sizes & are widely sold in US craft stores.
LikeLiked by 3 people
Thank you, again…..you have just solved something that should have been obvious, but my addled brain does not always work!!
I have a well used milliner’s block, inherited from my darling Nan, who, so I was told, trained as a milliner in the early 1900s. Yes, it has thumb size holes in the under side….of course, to fit on a stand!!! To date I’ve improvised with a large tin of beans, a house brick on end, a cake icing turntable…..none 100% successful…..now I know better… I have an off cut of broom handle (such useful items, broom handles), I’m sure I can improvise a base ……..
And, I’ve never noticed numbers on the side, or…. perhaps I did, and never thought what the significance might be,!!!!?
Thank you, again, I love your writings, they always make me smile. 🙃
LikeLiked by 2 people
I use a balloon when blocking my hats, cheaper than a block and you can blow it to whatever size you want!
LikeLike
When I started knitting, I began with heavily felted hats, which needed some serious blocking and shaping. I could not find a milliner’s block at the time, and found that an old ceramic container in which we keep the pup treats, topped with a perfect-for-my-head thrift store bowl, was exactly what I needed. The bowl fit perfectly over the top of the pup treat container, which tapered in at just the point where ribbing often needs less stretch. My kitchen is full of double-duty objects!
Not surprisingly, the pups were not too excited about the limited access to the treat stash, and I wasn’t about to disturb my perfect creation. That is the point where I started making homemade pup treats, and that continues to this day as well!
LikeLiked by 2 people
What a wonderful story!
LikeLike
Thanks for the tips.
LikeLike
I, too, have a hat block (minus the stand). It was gifted to my mom by a neighbor we called Grandma Hain. This neighbor had used it to re-block her husband’s felt fedoras, size 22 1/2 . I received it from Mom because I knit, and also I must have had the biggest head of the six children! Mine sits upon an upturned planting pot to give it a solid stand. When asked about blocking hats, I just say that I use my wooden head!
LikeLiked by 2 people
Love this post because there are lots of times hats don’t have a “hat” shape when they comet off the needles. Easwas is quite an unusual shape and the natural tendency of a knitter would be to think, “I did something wrong” or “This can’t be right” or maybe even to frog. Thanks for showing the process. Proving once again, there’s nothing like a good wet block.
LikeLiked by 1 person
Hi Kate,
Inevitably, when knitting a hat I make it too big. I measure and swatch and gauge and it still comes out huge. Do you have advice on how to knit a good fitting hat? Or, like this one, with a nice amount of ease?
Thank you!
LikeLike
This is difficult to answer, Tasha, without knowing the size of your head or the style of your knitting . . . but I’d be tempted, as a first step, to cast on with a needle size at least two below the one recommended in the pattern? And, if you are swatching, make sure your swatch is knitted in the round (sometimes it’s better just to cast on the hat itself as a sort of swatch?).
If you have a wee head, or prefer something less slouchy, the fit of the hats might need more adjusting – this is often easily done by removing a pattern repeat (in the case of this hat, making a five point, rather than a six point crown).
Hope this helps!
LikeLike
I encounter this problem frequently when knitting with superwash yarn. All of Kate’s advice is great. I would add, block your swatch.
LikeLike